
Course Areas
Set up your greens, tees, fairways and other areas, keep their sizes right, and check them against the shapes traced on the Area Map
On this page
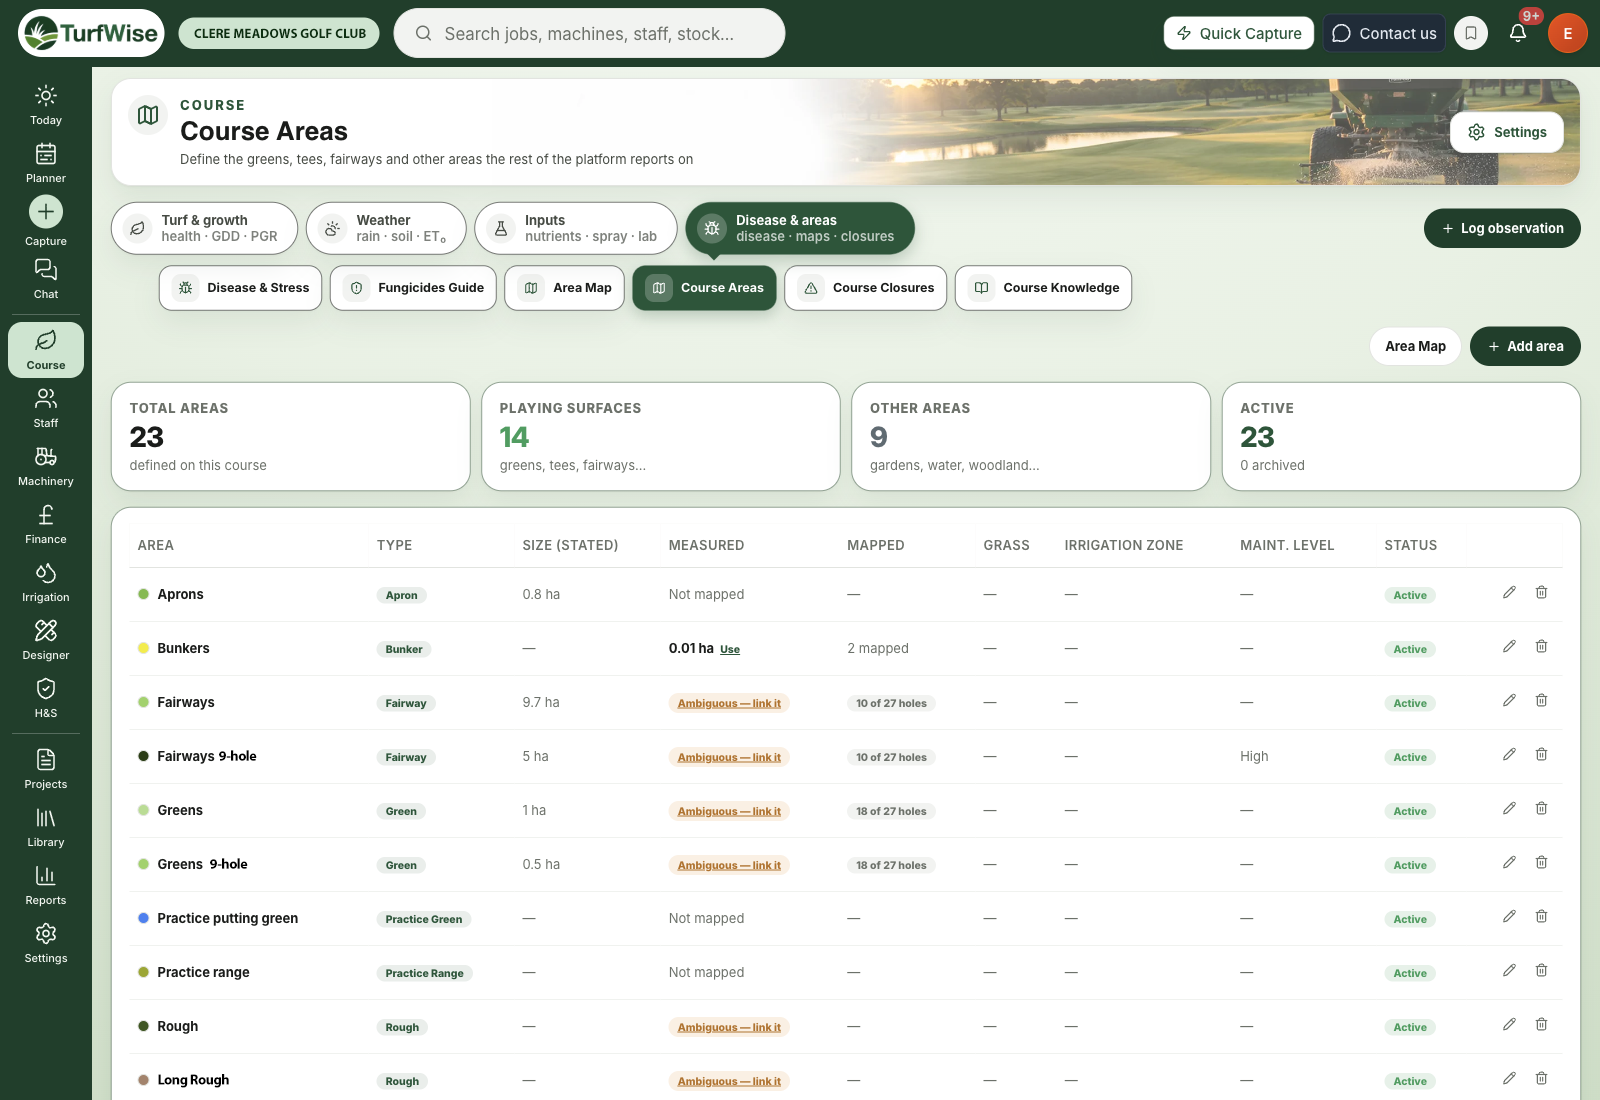
Course Areas is the list of every green, tee, fairway and other area on your course — the list the rest of TurfWise reports against.
When you log a spray, record a disease observation or look at nutrients by area, you're picking from this list. Getting it right once saves you headaches everywhere else.
Where do I find it?
Click Course in the top bar, then Disease & areas — the first entry in that group opens Course Areas. The page is included on Core, and it's also a tab in the row under every Course page's header.
Another way in
You can also reach it from Settings (under your avatar, top right) › Planner & machinery › Task templates, with Add / Edit Course Areas. Once you're on Course Areas, the links to Area Map, Course Closures and Course Knowledge work as normal.
 Open full-size image ↗
Why are areas set up on the desktop?
Areas are created, renamed and removed here, on the desktop — not in the TurfWise mobile app. That keeps one list for the whole club.
One list, one place
If crews could add areas from their phones as well, you'd soon end up with "7th green" twice and no way to tell which one the readings belong to. So the mobile app doesn't let you create, rename or delete areas — do that on this page.
How do I add an area?
You'll need a manager or admin login to add, change or delete areas.
Click Add area
The button is at the top right of the page.
Name it and pick a type
Give the area a clear Name (for example "Green 7" or "Practice putting green"). Choose a Type — the list is split into Playing surfaces (green, apron, surround, tee, fairway, approach, bunker, rough, semi-rough, practice, driving range) and Other areas (garden, woodland, water, other).
Enter the size
Type the Area size (ha) in hectares. This is the figure TurfWise uses when it works out spray rates and treated areas, so use the most accurate number you have.
Add the optional details
You can also set a Colour, Grass type, Irrigation zone, Maintenance level and Notes. Leave Active area ticked.
Save
Click Add area. The new row appears in the table straight away.
To change an area later, click the pencil icon on its row, make your changes and click Save changes.
Archive rather than delete
If an area is no longer used, edit it and untick Active area. It stays in the list marked Archived, so older records that mention it still make sense. The bin icon on a row deletes the area outright once you click Confirm.
What's the difference between "stated" and "measured" size?
Each area can have two sizes, and they answer different questions.
Size (stated)
This is the number you typed in. It's the one TurfWise actually uses for fertiliser, spray and budget calculations. Nothing overwrites it automatically — not the Area Map, and not the mobile app.
Measured
This is worked out from the shapes that have been traced on the Area Map over satellite imagery. It's shown alongside your stated figure so you can compare the two.
Nothing changes your stated size unless you say so
A club that paid for a proper survey shouldn't lose that figure to a rough satellite trace. So TurfWise never swaps the measured size in by itself — you decide, one area at a time.
How do I read the Measured and Mapped columns?
- A figure in hectares — the measured size. If it differs from your stated size by 10% or more, the difference is highlighted next to it.
- Use — appears when the two figures differ. Click it to replace your stated size with the measured one. TurfWise confirms the change and tells you what the old figure was.
- Not mapped — nobody has traced this area yet. That's not the same as the area having no size.
- Ambiguous — link it — two areas share the same kind of traced shape and neither says which it owns, so TurfWise can't tell whose measurement it is. Click the badge to fix it (see below).
- Mapped — how far tracing has got, for example "12 of 18 holes". For areas that don't follow the holes, such as ponds, it just shows how many shapes are mapped.
Fixing an "Ambiguous" area
Click Ambiguous — link it and the area's edit window opens. Find Measured from — it lists the kinds of traced shape that count towards this area's measured size.
Click the shape types that belong to this area to switch them on, then click Save changes. If you change your mind, Reset to the default for this area type puts it back.
Most areas never need this
Leave Measured from alone unless you see the Ambiguous badge. By default each area type picks up the right shapes on its own.
Where do the measured shapes come from?
Click Area Map at the top of the page (it's also under Course › Disease & areas in the top bar). The Area Map shows your traced course features on satellite imagery, with totals by type, and lets you export them as CSV or GeoJSON.
To trace or adjust shapes, click Open Editor on the Area Map. Once shapes are traced there, the Measured column on Course Areas fills in.
Common problems
- "The Use button isn't there" — it only appears when the measured and stated sizes differ. If they match, there's nothing to adopt.
- "My spray logger can't work out the treated area" — the area has no stated size. Edit it and enter the Area size (ha), or click Use to adopt the measured figure.
- "The Measured column shows a dash for everything" — the Area Map data didn't load. Your areas and stated sizes are unaffected; try again later.